English below
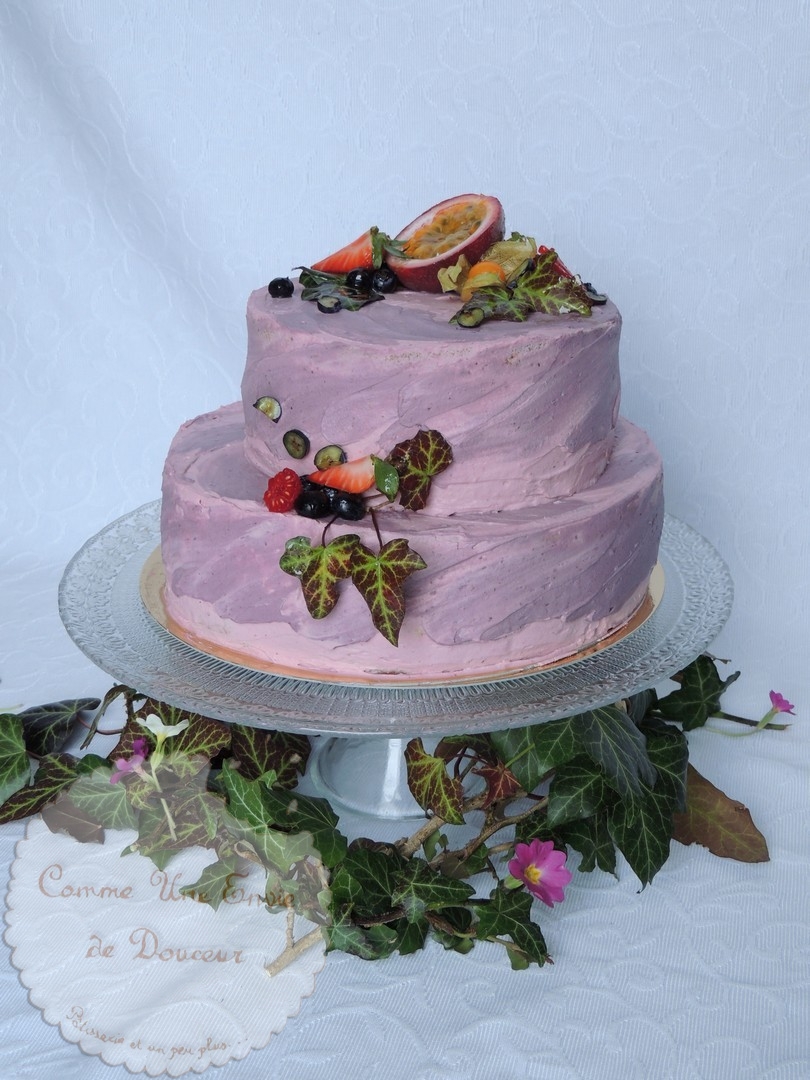
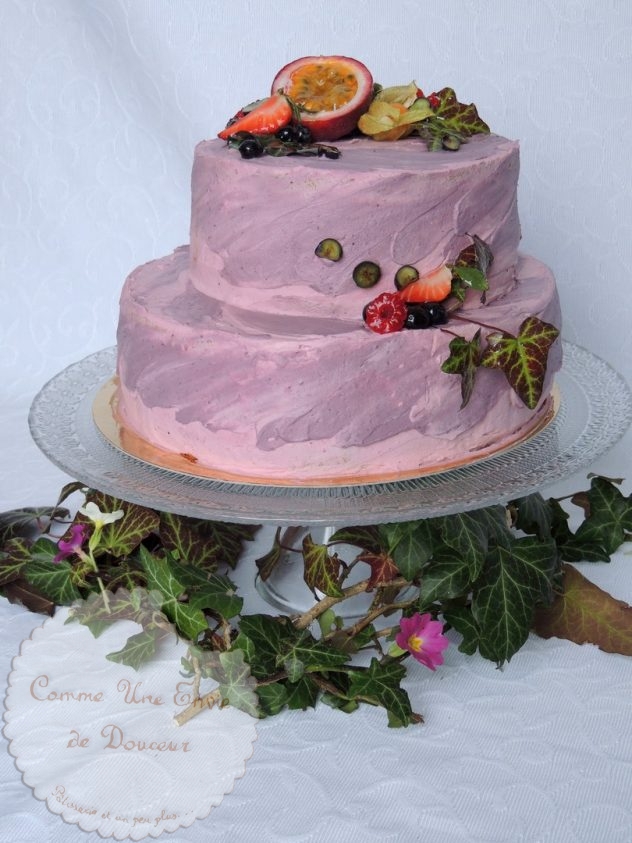
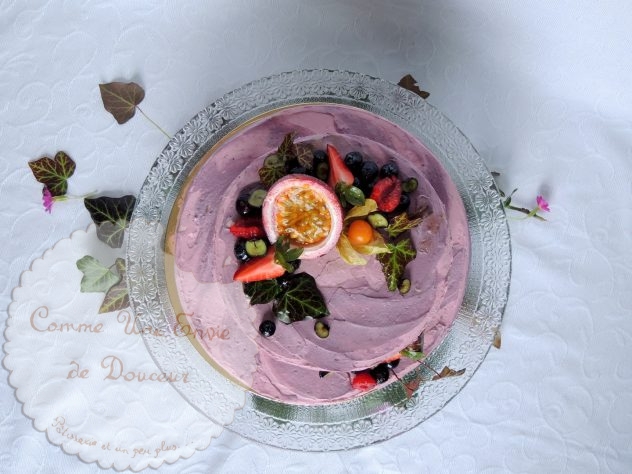
Zoom sur la décoration d’une pièce montée façon layer cake
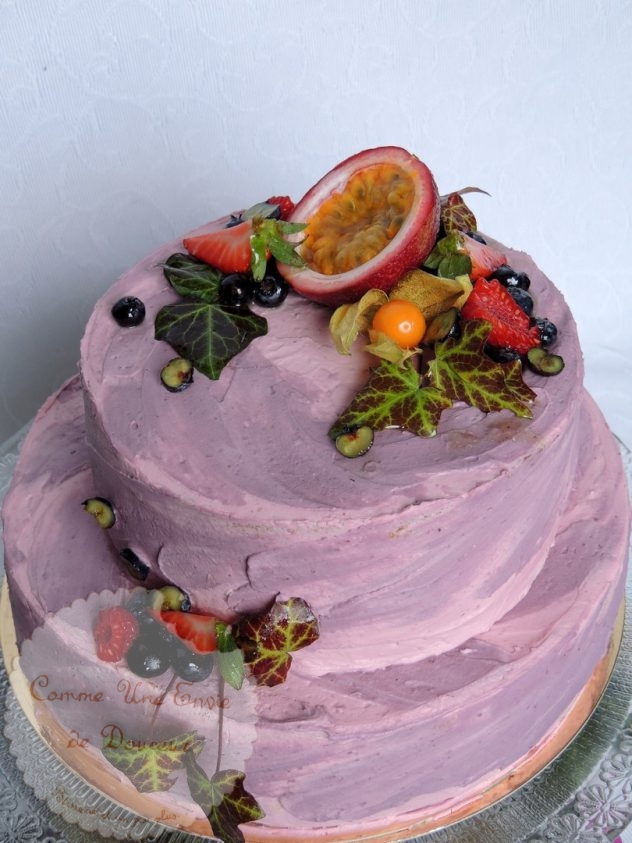
J’ai l’honneur de vous présenter mon premier gâteau en format pièce montée.
J’ai été missionnée il y a peu pour réaliser un gâteau pour un peu plus de 20 personnes, pour fêter les 30 ans (surprise) d’une amie. La fête se déroulant à 2h de route de chez moi il me fallait réaliser un gâteau qui se transporte facilement, qui résiste aux secousses mais aussi pas trop compliqué à réaliser et aux goûts qui plaisent à tout le monde. Le layer cake m’a semblé être le candidat idéal, plutôt simple à faire, assez léger pour conclure un repas copieux et bien décoré il en jette, parfait pour un gâteau d’anniversaire.
Pour une telle occasion il fallait que ce gâteau soit vraiment beau alors je me suis dit qu’en format pièce montée ce ne serait pas de trop. Je le voulais aussi original alors j’ai choisis de le couvrir d’une ganache bicolore. Le décor ce n’est vraiment pas mon truc mais je n’avais pas droit à l’erreur sur ce coup là, j’ai pris mon temps et je suis contente du résultat.
J’en ai donc profité pour faire une vidéo de l’étape décoration, pour encourager ceux et celles qui souhaiteraient se lancer mais qui n’ose pas. Rien de vraiment compliqué, il suffit seulement de prendre son temps, c’est un “coup de main” à prendre pour avoir le bon geste mais ça vient vite. Soyez indulgents, c’était ma première réalisation avec ce genre de déco. Vous verrez que mon geste est quelque peu hésitant au départ mais ensuite il devient de plus en plus sûr.
Pour environ 25-30 parts
1 cercle de 18 cm
1 cercle de 25 cm
La réalisation du gâteau est la même que celle du layer cake mûre chocolat. Seules les proportions changent et au lieu de mettre seulement de la crème à la mûre dans les couches du gâteau j’ai aussi mis de la ganache.
Suivez les conseils de réalisation puis les conseils de montage un peu plus bas:
Biscuit de Savoie
Réaliser un biscuit de 18 cm de diamètre et un de 25 cm de diamètre
11 œufs
400g de sucre
200g de farine
95g de fécule de maïs
10 càs de liqueur de mûre
Sirop de punchage
170g d’eau
210g de sucre
2 bouchon de liqueur de mûre
Chiboust mûre
750g de purée de mûre
150g de lait ou lait végétal
5 jaunes d’œufs
100g de sucre
90g de fécule de maïs
5g d’agar agar
2 bouchons de liqueur de mûre
45g de beurre ou huile de coco
135g de blancs d’oeufs
150g de sucre
45g d’eau
Ganache chocolat noir mûre
170g de purée de mûre
170g de crème liquide (ou crème végétale)
330g de chocolat 70% pâtissier
40g de beurre ou huile de coco
Ganache montée chocolat blanc décor
410g de purée de mûre froide
420g de chocolat blanc
600g de crème liquide (ou crème végétale)
Du colorant liposoluble violet
Ordre de préparation et assemblage
°La veille préparez la ganache chocolat blanc et mûre.
°Préparez le biscuit de savoie puis le sirop de punchage.
°Une fois le biscuit refroidi le découper en 3 épaisseurs (le petit et le gros) à l’aide d’un couteau à dents type couteau à pain. Le garder recouvert d’un linge afin qu’il ne sèche pas.
°Préparez la ganache chocolat noir versez dans une poche à douille.
°Préparer la chiboust, versez dans une poche à douille.
°Puncher le biscuit avec le sirop à l’aide d’un pinceau. Déposez la partie supérieure du biscuit, côté bombé sur le dessous, au fond du cercle à pâtisserie chemisé de rhodoïd ou papier sulfurisé.
°Pochez une petite couche de ganache, ensuite une couche de chiboust, recouvrir avec le biscuit (l’épaisseur du milieu), il faut le puncher sur les deux faces.
°Versez ensuite une autre couche de ganache puis de crème chiboust puis recouvrir avec le fond du biscuit de savoie restant dont vous aurez préalablement punché la face intérieure. Tassez bien.
°Placez le gâteau au réfrigérateur pour environ 2-3 heures afin que la crème fige.
La décoration
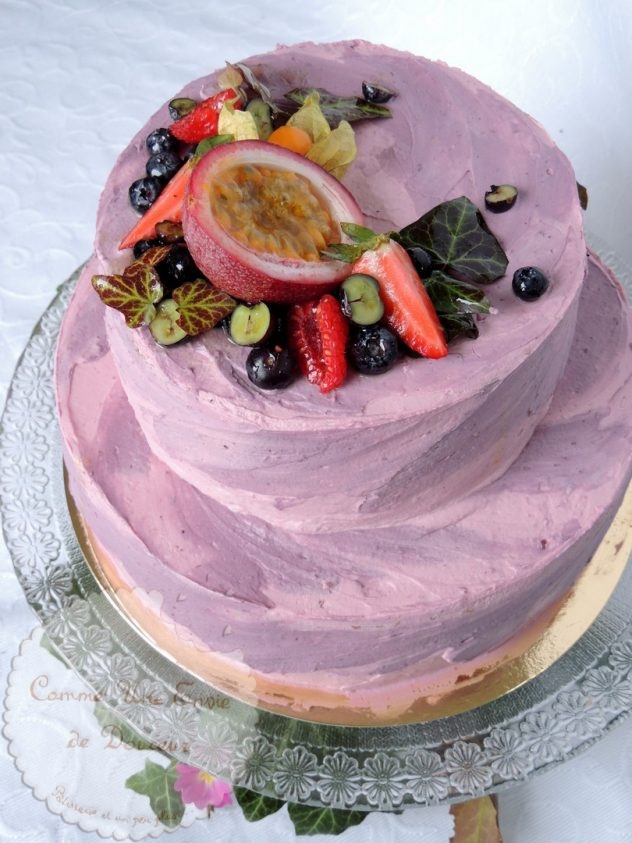
°Colorez environ 1/3 de la ganache chocolat blanc avec le colorant violet. Ajoutez un pointe de couteau, mélangez à l’aide d’une maryse. Procédez avec parcimonie et ajoutez tout doucement du colorant jusqu’à obtenir la couleur souhaitée. Montez ces deux ganaches au fouet comme une crème chantilly et les mettre dans 2 poches à douille.
°Pour obtenir un contraste un peu plus prononcé entre les deux couleurs j’ai ajouté une pointe de colorant blanc dans la ganache rose. Mais vous pouvez également ajouter du rose si telle est votre envie.
°Commencez par décorer le petit gâteau de ganache, le mettre de côté puis placez le plus gros qui constitue la base sur son socle (pour faciliter le transport une fois fini) et le décorer à son tour.
°Pour coller le petit gâteau sur la base déposez un peu de ganache au centre. Utilisez une palette pour déplacer le petit gâteau et le placer délicatement au milieu du gros. Pour ma part j’y ai été en mode barbare et il n’était pas bien centré. Mais une fois posé c’est trop tard !
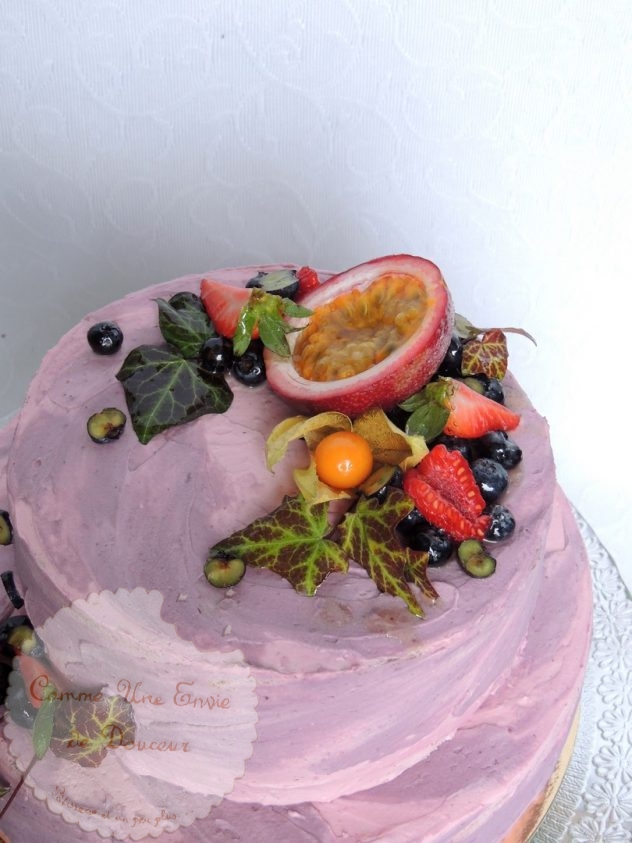
°Vous pouvez maintenant décorer le gâteau avec des fruits, des fleurs ou ce que vous voulez. Pour ne pas me louper en faisant des traces sur le gâteau j’ai découpé un disque de papier sulfurisé du même diamètre que le petit gâteau et ait d’abord déposé mes fruits dessus pour voir quel était le rendu avant de les déposer sur le gâteau.
Zoom on the decoration of a layer cake
I have the honor to present to you my first “piece montée”cake.
I was recently missioned to make a cake for about 20 servings, to celebrate the 30th birthday (surprise) of a dear friend of mine. The party took place 2 hours drive from home I had to make a cake that is easily transportable, resistant to jolts but also not too complicated to achieve and tastes that please everyone. The layer cake seemed to me to be the ideal candidate, rather simple to make, light enough to conclude a copious meal and well decorated it make a beautiful surprise, perfect for a birthday cake.
For such an occasion the cake had to be well decorated and beautiful so I told myself that a double layer cake would not be too much. I wanted it to look original so I chose to cover it with a two-colours ganache. The decor is really not my thing but I couldn’t mistaken on this one, I took my time and I’m happy with the result.
I took the opportunity to make a video of the decoration, to encourage those who would like to try but who does not dare. Nothing really complicated, just take your time, you’ll need a few minutes to get the hang of it. Be indulgent, it was my first realization with this kind of decoration. You will see that my gesture is somewhat hesitant at first but then it becomes more and more sure.
The preparation is the same than the blackberry & chocolate layer cake . I only changed the quantities and added dark chocolate ganache into the cake’s layers.
Follow the preparation steps as written in the layer cake recipe, then follow the assembly steps bellow:
For a pastry circle of 21 cm diameter
11 eggs
400g of sugar
200g of flour
95g of corn starch
10 caps of blackberry liquor
Soaking syrup
170g of water
210g of sugar
2 caps of blackberry liquor
750g of blackberry purée
150g of milk or plant milk
5 egg yolk’s
100g of sugar
90g of corn starch
5g of agar agar
2 caps of blackberry liquor
45g of butter or coconut oil
135g of eggs whites
150g of sugar
45g of water
Icing blackberry chocolate ganache
170g of blackberry purée
170g liquid cream or plant cream
330g chocolate 70%
40g butter or coconut oil
Whipped up ganache, white chocolate blackberry
410g of cold blackberry purée
420g of white chocolate
600g of liquid cream or plant based cream
Purple liposoluble dye
Order of preparation & assembly
°The day before make the white chocolate ganache.
°Start by making the biscuit, then the syrup.
°Once the biscuit cold cut it in three parts and set aside.
°Prepare the dark chocolate ganache, pour in a piping bag. The make the chiboust cream pour ib a piping bag.
°Using a brush soak the biscuit with the syrup. Put the top part of the cake upside down in the pastry circle (greased or lined with a baking sheet).
°Pout over it a layer of dark chocolate ganache, then a layer of chiboust cream, then cover with the middle part of the cake, you have to soak it on both faces.
°Then pour over it another layer of ganache then chiboust cream, cover with the last part of the cake. Push it down so it could be straight.
°Place in the fridge for at least 2 hours.
The decoration
Have a look at the video above.
° Color about 1/3 of the white chocolate ganache with the purple dye. Add a knife tip, mix with a spatula. Proceed sparingly and slowly add colorant until the desired color is obtained. Whip up separetly these two ganaches like whipped cream and put them in 2 piping bags.
° To get a more pronounced contrast between the two colors I added a dash of white dye in the pink ganache. But you can also add pink if that’s your desire.
° Start by decorating the smaller cake, set it aside and place the biggest one on its board base (to facilitate transportation once finished) and decorate it.
° To glue the small top cake on the base place a little bit of dark chocolate ganache on the middle of the bigger cake. Use a flat spatula to move the cupcake and gently place it in the middle of the big one. For my part I did it the barbaric mode and it was not centered. But once it made is too late to move it again !
° You can now decorate the cake with fruits, flowers or whatever you want. I was afraid I could spoil the cake if I didn’t stack the fruits properly, so I cut off a disc of parchment paper of the same diameter than the top cake and firstly put my fruits on it to see what was the rendering before putting them on the cake .


il est superbe!!!! bisous